Freer & Productive Activities
Freer & productive activities generally involve using a productive skill (speaking or writing) in a non-restricted environment that focus on the development of fluency. There is an important distinction between the two activity types:
Productive Activity: Is either a speaking or writing activity focused on developing the SKILL of speaking or writing for fluency (meaning speaking in a generally uninterrupted flow), generally comes at the end of a lesson, and should be within the same context of the lesson it ends.
Freer Acrivity: Is the same as a productive activity, generally, although there is one important distinction: it requires the use of particular target language (whatever vocabulary, grammar, or functional language that is the focus of the lesson).
Although freer and productive activities are different (in that freer practice requires the use of specific target language e.g. 10 particular vocab words or a specific grammar point etc.), in practice they often appear very much the same and can still use the same interaction patterns and general activity type. Just remember, if it’s a freer activity, to encourage the use of the target language during the activity in the instructions before they start the activity.
Below are some examples of different freer & productive activities separated into two broad categories based on the two skill focuses of speaking and writing.
Speaking Activities
Pyramid Activity
This activity includes three main stages: 1) Individual Ranking; 2) Partner Ranking; 3) Group Ranking.
Individual Ranking: The activity starts with the students making some kind of ranking in terms of importance individually i.e. ranking 7 items from 1-7 in terms of their importance in order to survive on an island. It’s important to note that each of the seven items needs to have a unique number ranging from 1-7 (there can be no two items with the number 2, for example).
Partner Ranking: In partners, students have to come up with ONE mutual list, so the students will have to come to an agreement.
Group Ranking: After the partner ranking, split the class into larger groups where the students will have to come to a consensus to make one common list.
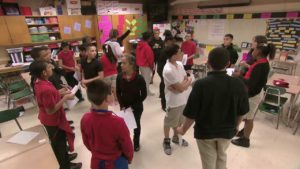
Mingle
For this activity, students will stand up, walk around, and speak to other students similar to ‘mingling’ in a social gathering. Common mingle activities include:
- Surveys
- ‘Find someone who..’ activities.
- Sharing ideas/Stories
- Exchanging personal information
- ‘Getting to know you’ activities
Etc.
Group Speaking
The students speak together in groups of around 3-6 (depending on class size). Some ways to do group speaking activities:
- General Discussion: Give the students some kind of prompt with 3-4 points and have them discuss the topic.
- Paper Slips: Each group gets paper slips with particular topics/questions etc. on it. Use a timer and after each interval (for example, 1 minute), students flip over the next paper slip with the new question/topic to discuss.
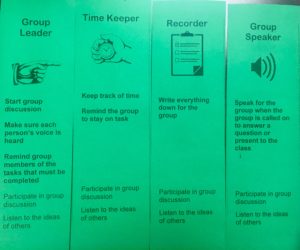
- Assigning Roles: You can assign each group member a separate duty, for example:
Debates
Students debate a particular topic.
Important points:
- Note-Taking Device: Have students brainstorm using some kind of note-taking device to gather their thoughts before doing the debate.
- Grouping: You can group the students in the following ways:
- Put ‘for’ and ‘against’ students into one group (i.e. of 6 people – 3 for and 3 against) and have them debate amongst each other.
- Put ‘for’ students into the same group and ‘against’ students into another group. They discuss and prepare their arguments.
- Presentation: You can have the students present their ‘for’ and ‘against’ views in front of the class as a presentation.
- Forum: You can have the whole class come together and debate each other after discussing their views in groups.
Inner/Outer Circle
Students get placed into two circles: an inner circle where the students’ are facing outward, and an outer circle where the students are facing inward (so that the students in both circles are facing each other). From there, you call out a topic/question etc. to discuss for a determined time interval i.e. 1 min, 30 sec, etc. After one time interval is complete, then the students in the outer circle rotate to the right – with a new partner – and then you call out a new topic/question etc. to discuss for the next time interval. Continue for another 3 or so rounds.
Note: If you have an odd number of students, you can either have two students rotate on the outer circle together (so there will be one group of three speaking) or have the odd student sit out and listen to one pair of students speak for one time interval. After the time interval is over, then you can ask the student what he had heard from the pair speaking. Then, for the next interval, the odd out student rejoins the circle and anther student takes his place in being the one to listen.
Walk Around the Room
Students walk around the room in pairs or groups of 3 and discuss different prompts/visuals that are posted up on the walls. It’s nice to give them some kind of note-taking activity as they go around and discuss the different prompts and/or visuals.
Role-plays
Students are tasked to act out a particular scene, play, communicative task etc.
Important Notes:
- Information Gap: A nice tool to use in tandem with a role-play is an information gap. An information gap is where students have handouts with different information on them and they have to communicate in order to bridge the gap of information. For example, students might do a role-play where they are ordering food in a restaurant and the student waiters have information on their menu that the student customers do not have and need in order to make their order. Here is a link to an example lesson.
- Drama: You can have students act out drama clips with an emphasis on improving their pronunciation i.e. sentence stress and intonation. Here are some examples of drama clips that the students can imitate for role-plays with a focus on developing their pronunciation of sentence stress and intonation.
- Target Language Focus: You can have a particular set of target language that you want the students to use; you can ensure that the students use the target language with help from a scaffolding device (i.e. some kind of handout that has some of the target language imbedded in it, for example, questions to ask, vocabulary items etc.) and also ICQs such as: “So what words/grammar point/phrases do you need to use?”
Drawing a Picture
Give the students two handouts that are split into two sections: the upper-part has an image and the lower part has an empty spot to draw a picture. The handouts have different images on them and working in partners the students have to explain their image to their partner to draw and visa-versa. At the end of the activity, the partners show the original image to their partners to see how close their drawing was to the original.
This activity corresponds well with:
- Vocabulary of Physical Features: Teaching vocabulary relating to body parts etc.
- Vocabulary of Items: Teaching vocabulary relating to furniture, for example.
- Vocabulary of Geography: Teaching vocabulary relating to natural features like mountains, lakes etc.
- Vocabulary relating to Cities: I.e. buildings, offices, parks etc.
- Prepositions: Students have to describe where things are located i.e. there is a ball on top of a table and there is a cup next to the ball etc.
- Present Continuous: Students describe what people are doing in their image i.e. there is a man sitting by a table drinking tea while another man is standing and taking pictures next to the table.
Etc.
Writing for Fluency
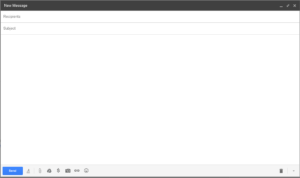
Email/Letter Writing
Have students write back and forth to each other in class in letter or email form. You can download an email or letter template for them to fill in from Google images or just take a screen shot of an empty email from your own email account. Print it and give it to the students as a handout.
Essays
Have students write an essay inside of the classroom following the typical essay format:
- Introduction
- Hook: Include a first sentence that captures the attention of the reader.
- Thesis: Has a sentence that sums up the main idea/argument etc. of the writer.
- Body Paragraphs
- Topic Sentence: Has a sentence that describes the main idea of the paragraph.
- Transitioning Sentence: The last sentence of the paragraph that transitions into the proceeding paragraph.
- Conclusion
- Brief Summary: Summarizes the main points of the paper in brief (1-3 sentences).
- Concluding Sentence: The last sentence of the concluding paragraph that states the final opinion of the article and why it is important for the reader.
Usually you want to give them around 5-10 minutes to develop some kind of brainstorm, outline, or mind map of their writing beforehand. Also, you should lead them into the writing first by giving them a reading and then some kind of essay prompt that is based on the context of the reading. You can read about the process and see some examples here. Furthermore, many students like to practice writing I-ELTS or TOEFL essays: here is a link to some essay prompts that are categorized by different topics; you can choose a prompt that has to do with the context of the lesson you’re teaching.
Poems
You can have the students write poems. Here is a link to some different types of poems and some examples of each.
Free Writing
Have students write about whatever topic without worrying about following a standardized form i.e. just one paragraph rather than following any organization such as an intro, body, and conclusion.
Story from Visuals/Comic Strip
Students write a story based on visuals – can be individual images or in comic strip form.
Giving Advice
Step 1: Students write one paragraph about a problem.
Step 2: Students pass paper to another student who writes advice on how to improve the problem.
Step 3: Students pass papers again and then write one final paragraph evaluating the problem and whether it was good or bad advice and adding any other additional info they might have.
Story From Prompt
Give students a topic to write about (i.e. a ‘scary story’) or an introduction to a story – either a few sentences or perhaps a full paragraph – and then they continue it using their imagination. You can do this in a series where the students write a paragraph, pass it down to the next student, the next student writes a paragraph on where the previous student left off, pass it again, and so on until the story is finished.
Instant Messaging/Text Messaging
Give students a template of an instant messaging/text messaging conversation and have them pass their paper back and forth as they engage in conversation based on whatever topic/context of the lesson. Good to include some informal language teaching or perhaps ‘computer talk’ into such lessons i.e. spelling ‘going to’ as ‘gonna’, acronyms (LOL, FYI etc.), emojis, and the like.
Biographies
Have students write biographies/autobiographies based on either fiction or non-fiction. For example, you could have a few pictures of random people (i.e. a hippy, small child, an athlete) and students imagine a biography for one of them and after reading each others’ they have to guess which biography belongs to which picture.
Some Considerations:
- Sometimes it can be nice to have a warm-up stage where the students brainstorm ideas about what they want to speak or write about, usually by taking some kind of notes (not writing in complete sentences) or making an outline. Though, this should be done quickly (about 2-5 min).
- Some kind of note-taking handout and/or graphic organizer can be useful to facilitate student participation.
- A timer usually will facilitate the activities and keep the focus on speaking for fluency e.g. Give students one minute to discuss a prompt before going to the next one and giving them another minute.
- Focus on giving instructions:
- Include ICQs that focus on the SS achieving the aim: speaking or writing for fluency. For example:
- Are you going to be writing short notes or in paragraph form? A: Paragraph form (to focus on writing for fluency).
- Are you going to be saying only short one word answers or having a long discussion? A: A long discussion (to focus on speaking for fluency).
- Include a demo and/or example of the task because freer & productive activity instructions are typically more difficult for students to understand. Also, a good example should spark the students interest and creativity in the activity i.e. make sure that the example is a good one that promotes fluency practice and is fun.
- Include ICQs that focus on the SS achieving the aim: speaking or writing for fluency. For example:
- You want to give feedback on both content and language.
- Content: Is focused on discussing the idea of what the activity was about i.e. what the students discussed or wrote about.
- Language: Is focused on giving delayed error correction (DEC) feedback on the errors that the teacher noticed while the students were practicing speaking/writing for fluency.
- NOTE: Content feedback should always come before language feedback.
- NOTE: Do NOT interrupt students and correct them while they are doing the activity itself; wait until the activity has ended and then go over error correction – because interrupting the students would impede them practicing for fluency